State Management using NGRX
Before jumping directly in NGRX will know few things about Redux. Let’s get started …
Redux:
Redux is an open Source JavaScript library which is use to manage the state of the Application.
Principle of the Redux:
- Store : Which store the App state.
- Actions: Basically state is read only if we want to do any changes we will dispatch the Actions.
- Reducer: All the state change will be happen inside the reducer, it responds to the actions and based on the actions create an immutable state and returns to the store.
- Selectors: Selector is function which is used to obtain the part of state from store.
- Effects: It is mechanism listens for the dispatched actions in observable stream, process the server response and returns new actions either immediately or asynchronously to the reducers to change the state.

Advantages of Redux:
- consistent code.
- All states are centralised in store.
- By using the Redux Dev tools we can easily debug.
- It is flexible we can use any framework for UI
Installations:
Schematics provides Angular CLI commands for generating files when building new NgRx feature areas and expanding existing ones.
Install Schematics globally : npm install @ngrx/schematics -g
Later need to tell Angular CLI that we have installed schematics please add it ng add @ngrx/schematics
ng generate @ngrx/schematics:store State — root — module app.module.ts
Install effects npm install @ngrx/effects — save
Installing entity npm install @ngrx/entity — save
This is for installing the dev tools npm install @ngrx/store-devtools –save
ng generate @ngrx/schematics:effect App — root — module app.module.ts
Now all required npm modules have been installed.
Create a Folder called reducer and create a index.ts file

Import all the required modules and line 12 created a State interface at line 17 created a reducer with state type.
create a action file example user.actions.ts

Import all the required modules user interface.In line 3 declare all the types of actions.And create all classes for declared Actions.
In LoadUsers is the class we are just defining the type of it.
In LoadUsersSuccess class defining type and define constructor with payload as data interface.This action will executed when the API got success.
In LoadUsersFailure define type and constructor with payload as error.This action will be executed when the API is failed. At last export all the 3 types of actions.
User.reducer.ts

In this file import all the action modules. At line 7 interface of State has been declared.
In the above code initial state has been mentioned at line 12 and reducer function is at line 17.This reducer function consists 2 params one is the state and another is actions. As we declared 3 actions in actions.ts file we are going to specify that actions in switch case. In load users just load state in loadusersSuccess load state, users, and error will be empty. In loaduserError state, user will be empty and specify error.
Selectors:(users.selectors.ts)

- In this selectors file already 2 selectors have been imported one is CreateFeatureSeletor and CreateSelector.
- Later import the State from the user.reducer.ts file.
- Create a constant getUserFeatureState and assign CreateFeatureSeletor and specify the type as <state> and name of the state as userState.
- Create a selector getUsers by using createSelector method and specify getUserFeatureState which has been declared at the top and specify the users from the state (state.users).
- Create an error selector and include the getUserFeatureState and error state in it.
user.component.ts
In the component first we need to import the store and Select from the Ngrx/strore. Later import the actions from the actions file.Later import the selectors from selectors file.

- Store is like a service so we have to include that in constructor.
- We need to dispatch the action this.store.dispatch(new UserActions.LoadUsers());
- After Dispatching the action get the data from selector LoadUsers
- Here store is Observable by using the pipe we can perform operations we can include the selector and subscribe it then only we will get the data.
- In the same way we need to subscribe to the error selector.
Effects:
Effects generally used to communicate with the services and takes actions
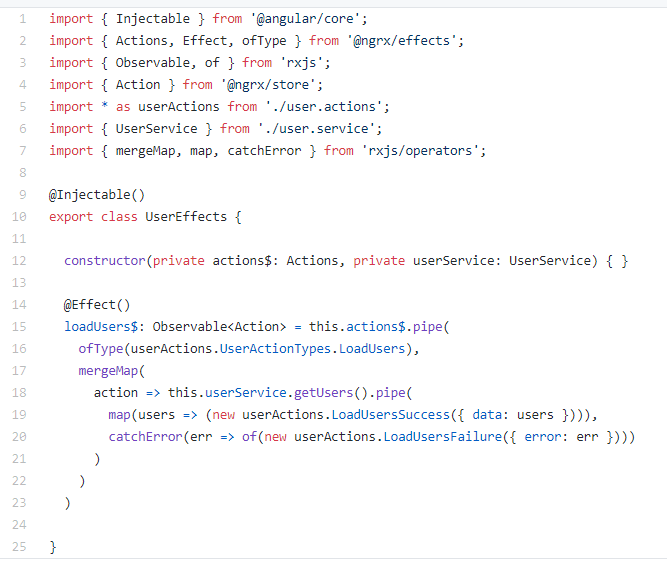
- Import all the required modules into the effects file effects modules, rxjs operators, actions and services.
- Include the actions$ observable and user service in the constructor.
- @Effect() method used when effects will be called .
- Create one observable loadUsers$ and include type<actions>
- This.actions$ is observable include pipe to perform actions.
- OfType() is used for filter effect inside it include the action in it LoadUsers.
- In merge map include the userService APi call use pipe to perform actions
- In map include success actions and include payload.
- If error occurs catchError by using of() use LoadUsersFailure and pass payload in it.
This is as simple as angular but we are going to maintain all the states in a store file so it would be easy to manage.
